如何使用WordPress评论功能做自定义留言表单?
最近更新时间: March 27, 2024
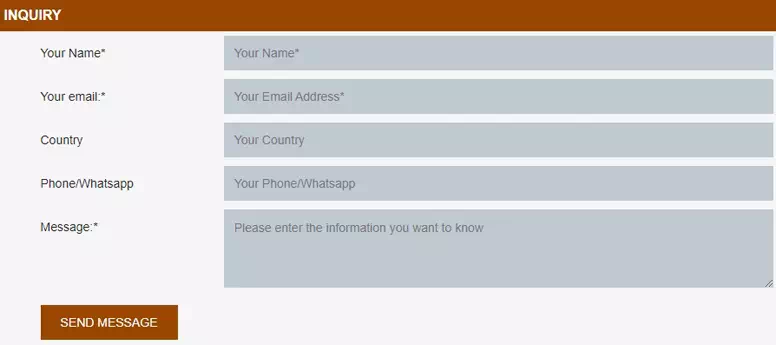
使用Wordpress自带的评论功能做网站表单,不仅方便简洁,而且可以直接设置邮件自动转发提醒,但是由于其自带的评论功能比较简单,所以要想作为网站的留言表单还需要进行一些自定义修改。先看下最终效果:

在修改之前,需要先了解以下几点:
系统默认存在的字段有:作者(姓名),邮箱地址,评论内容,评论页面,提交时间以及ip地址,这几个我们一般是可以直接拿来用的,只需要修改下展示名称,英文网站也是一样,比如将作者改为name等,如果实在不需要可以进行删除。
具体修改方法如下:(除了CSS以下代码都是添加到对应主题目录下的functions.php文件中)
步骤一:删除评论模块中不需要的字段
示例:删除url字段即评论页面地址
function url_filtered($fields)

{

  if(isset($fields['url']))

	unset($fields['url']);

  return $fields;

}

add_filter('comment_form_default_fields', 'url_filtered');
步骤二:添加额外的自定义字段
比如除了现有的字段外,我们还需要客户的电话或者所处的国家地区。
示例:添加电话字段phone和国家字段country
add_filter('comment_form_default_fields','comment_form_add_phc');

function comment_form_add_phc($fields) {

$label1 = __( 'Phone/Whatsapp' );

$label2 = __( 'Country' );

$value1 = isset($_POST['phone']) ? $_POST['phone'] : false;

$value2 = isset($_POST['country']) ? $_POST['country'] : false;


$fields['phone'] =<<<HTML

<p class="comment-form-phone">

<label for="phone">{$label1}</label>

<input id="phone" class="blog-form-input" placeholder="Your Phone/Whatsapp "
name="phone" type="text" value="{$value1}" size="30" />

</p>

HTML;


$fields['country'] =<<<HTML

<p class="comment-form-country">

<label for="country">{$label2}</label>

<input id="country" class="blog-form-input" placeholder="Your Country " name="country"
type="text" value="{$value2}" size="30" />

</p>

HTML;


return $fields;

}
步骤三:将自定义的评论字段添加到网站数据库
示例:将电话字段phone和国家字段country添加到数据库
add_action('wp_insert_comment','wp_insert_phone',10,2);

function wp_insert_phone($comment_ID,$commmentdata) {

$phone = isset($_POST['phone']) ? $_POST['phone'] : false;

$country = isset($_POST['country']) ? $_POST['country'] : false;

update_comment_meta($comment_ID,'_country',$country);

update_comment_meta($comment_ID,'_phone',$phone);

}
步骤四:将自定义的评论字段添加到网站后台评论界面
示例:将电话字段phone和国家字段country显示在后台评论页面

网站后台显示新添加的字段
add_filter( 'manage_edit-comments_columns', 'my_comments_columns' );

add_action( 'manage_comments_custom_column', 'output_my_comments_columns', 10, 2 );

function my_comments_columns( $columns ){

$columns[ '_phone' ] = __( 'Phone' );

$columns[ '_country' ] = __( 'Country' );

return $columns;

}

function output_my_comments_columns( $column_name, $comment_id ){

switch( $column_name ){

case '_phone';

echo get_comment_meta( $comment_id, '_phone', true );

break;


case '_country';

echo get_comment_meta( $comment_id, '_country', true );

break;

}}
步骤五:将评论文本框放到最后面
因为Wordpress默认的留言表单是先显示评论文本框,然后才姓名、邮箱等字段,但是通常我们的留言表单是是把评论文本放到后面,所以还需要在主题根目录下的functions.php文件中添加以下代码:
function wpb_move_comment_field_to_bottom( $fields ) {
$comment_field = $fields['comment'];
unset( $fields['comment'] );
$fields['comment'] = $comment_field;
return $fields;
}

add_filter( 'comment_form_fields', 'wpb_move_comment_field_to_bottom');
步骤六:将自定义后的评论代码添加到相应的页面模板
示例:将以上自定义评论代码添加到需要的页面或者模板中
<?php

                    $comments_args = array(

        // Change the title of send button

        'label_submit' => __( 'SEND MESSAGE', 'textdomain' ),

        // Change the title of the reply section

        'title_reply' => __( 'INQUIRY', 'textdomain' ),


        // Redefine your own textarea (the comment body).

        'comment_field' => '<p class="comment-form-comment">' . '<label for="author">' . __( 'Message:*' ) .
'</label> ' . '<textarea id="comment" class="blog-form-input-area" name="comment"
placeholder="Please enter the information you want to know" aria-required="true"></textarea></p>',

        'fields' => apply_filters( 'comment_form_default_fields', array(


    'author' =>

      '<p class="comment-form-author">'  . '<label for="author">' . __( 'Your Name*' ) . '</label> ' .

      '<input id="author" class="blog-form-input" placeholder="Your Name* " name="author"
type="text" value="' . esc_attr( $commenter['comment_author'] ) .

      '" size="30"' . $aria_req . ' /></p>',


    'email' =>

      '<p class="comment-form-email">'. '<label for="author">' . __( 'Your email:*' ) . '</label> ' .

      '<input id="email" class="blog-form-input" placeholder="Your Email Address* "
name="email" type="text" value="' . esc_attr(  $commenter['comment_author_email'] ) .

      '" size="30"' . $aria_req . ' /></p>',


    )

  ),

);

comment_form( $comments_args );

?>
步骤七:通过CSS进行评论表单样式修改
因为每个人多表单样式要求不同,这里就不在列出相关的CSS代码
最后需要注意的是调用评论表单的时候 一定要把对应的页面开启评论功能,否则前端页面不显示。

开启页面评论功能
版权声明©:希望对您会有所帮助;转载请注明出处。


